
by Kanimozhi BV | Sep 18, 2024 | Garden, Exterior
How to disguise drain covers in garden? Here is the answer. Drain covers are essential components in any garden, as they help prevent waterlogging and maintain proper drainage.
However, they can also be unsightly and disrupt the overall aesthetic of your outdoor space. Whether you have a beautifully landscaped garden or a simple patch of greenery, a visible drain cover can be a bit of an eyesore.
Fortunately, there are plenty of creative and practical ways to disguise these covers without sacrificing their functionality.
In this guide, I’ll show you 8 effective ways to disguise drain covers in your garden so you can enhance your outdoor area while keeping access to drainage when needed.
Why Should You Disguise Drain Covers in Your Garden?
There are several reasons why you might want to hide or disguise drain covers in your garden:
- Aesthetic Appeal: Garden drain covers can stick out like a sore thumb, especially in a well-maintained garden. By disguising them, you can improve the overall look and ensure the design flows naturally.
- Safety: An exposed drain cover can pose a safety risk, particularly if it’s placed in a walkway or play area. Disguising it ensures it blends into the garden while reducing the chance of accidents.
- Design Continuity: A garden should feel cohesive, and an exposed drain cover can disrupt the overall theme or design of your space. Integrating the cover into your garden’s aesthetic helps maintain a seamless look.
8 Ways to Disguise Drain Covers in Your Garden
1. Use Potted Plants or Raised Planters
One of the simplest and most effective ways to disguise a drain cover is by using potted plants or raised planters. This works particularly well if the drain cover is in a corner or along the edges of the garden.

How It Works?
Place large, lightweight pots or planters over or around the drain cover. You can choose from a variety of plants, such as flowers, shrubs, or even small trees. Ensure the pots are easy to move for quick access to the drain.
Why It’s Effective?
Not only do the plants add beauty and greenery to your garden, but they also effectively hide the drain cover without obstructing its function.
Tip: Use plants that are low-maintenance and non-invasive, so you won’t need to worry about root systems interfering with the drainage system.
2. Create a Stepping Stone Path
A stepping stone path is another great way to disguise a drain cover, especially if it’s located in the middle of a walking area. Stepping stones are practical, durable, and can easily be arranged to cover the drain without permanently sealing it off.
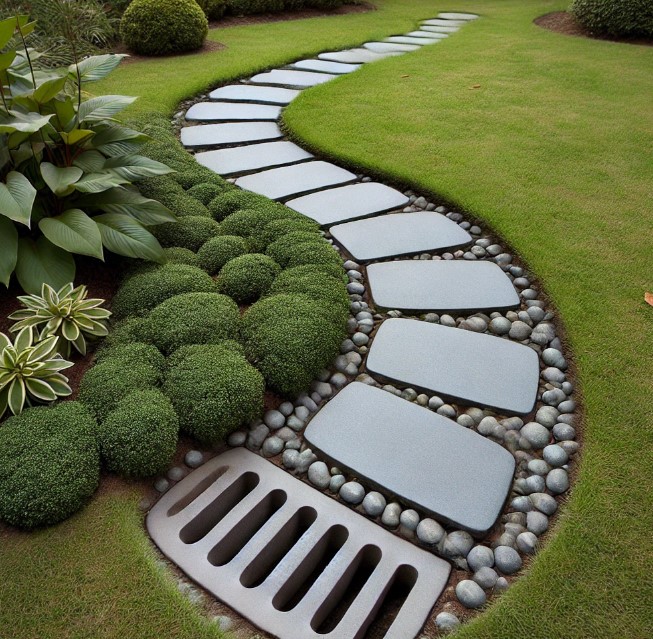
How It Works?
Lay flat stones or pavers over the drain cover. Make sure they are easy to lift if you ever need access. You can design the path to flow naturally through the garden or place the stones strategically in the most trafficked areas.
Why It’s Effective?
Stepping stones provide a functional and attractive way to blend the drain cover into your garden. They create a walking path while ensuring the cover is accessible.
Tip: Choose stepping stones that match your garden’s theme for a cohesive look, whether it’s rustic, modern, or traditional.
3. Install a Decorative Grate or Cover
Sometimes, instead of fully hiding a drain cover, you can opt for a more aesthetically pleasing version. Installing a decorative grate or cover can elevate the look of the drain while keeping it fully functional.
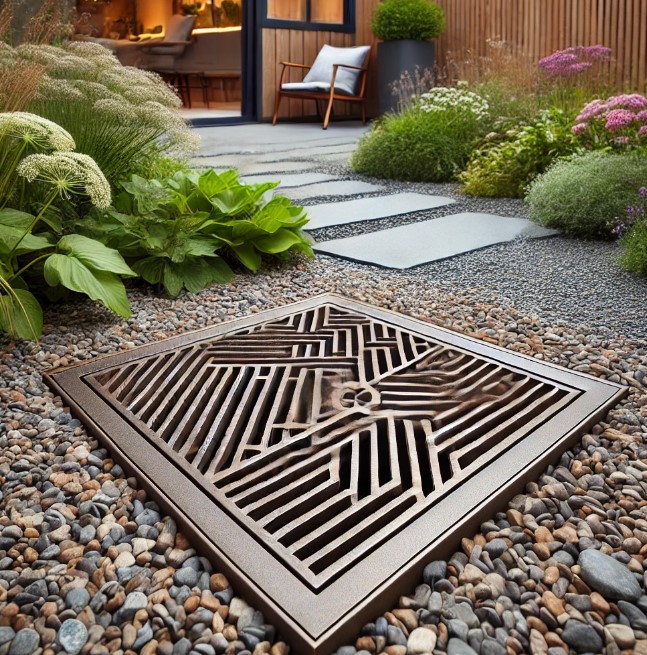
How It Works?
Replace the existing drain cover with a decorative one. Decorative grates come in a range of styles, from modern metalwork to rustic designs that add charm to your garden.
Why It’s Effective?
This option works well if you want a solution that enhances your garden’s look without fully covering the drain. It keeps the drainage visible but aesthetically pleasing.
Tip: Look for materials that are weather-resistant and durable such as cast iron or aluminium.
4. Surround with Gravel or Pebbles
For a more natural look, you can surround the drain cover with gravel or pebbles. This works especially well in contemporary or zen gardens where a minimalist, clean design is preferred.
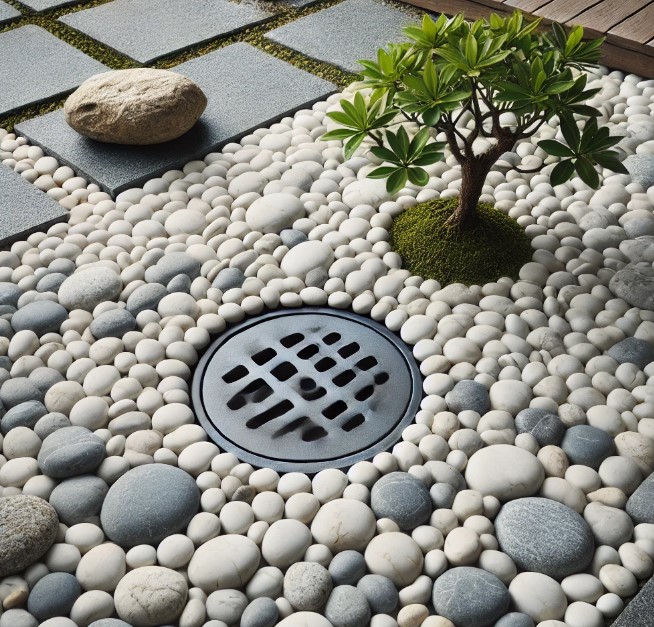
How It Works?
Create a gravel or pebble bed around the drain cover, making sure to leave space for water to drain properly. You can choose pebbles in different colours to complement the rest of your garden design.
Why It’s Effective?
Gravel or pebbles are a low-maintenance, budget-friendly solution that blends the drain cover into the landscape while keeping it easily accessible.
Tip: If possible, select stones that match the garden’s colour scheme for a cohesive aesthetic.
5. Use Artificial Turf
For a seamless look, especially in grass-covered areas, you can use artificial turf to disguise the drain cover. Artificial turf blends well with natural grass and creates a continuous surface.
How It Works?
Cut a piece of artificial turf to the size of the drain cover. Ensure it’s easily removable if you need access to the drainage system.
Why It’s Effective?
This method allows you to maintain the lawn’s natural appearance without the drain cover sticking out.
Tip: Make sure the turf is securely placed but easy to lift for routine maintenance.
6. Incorporate Decking or Wooden Panels
If your garden has a decked area, using wooden decking or panels over the drain cover can effectively hide it while creating a functional outdoor space.
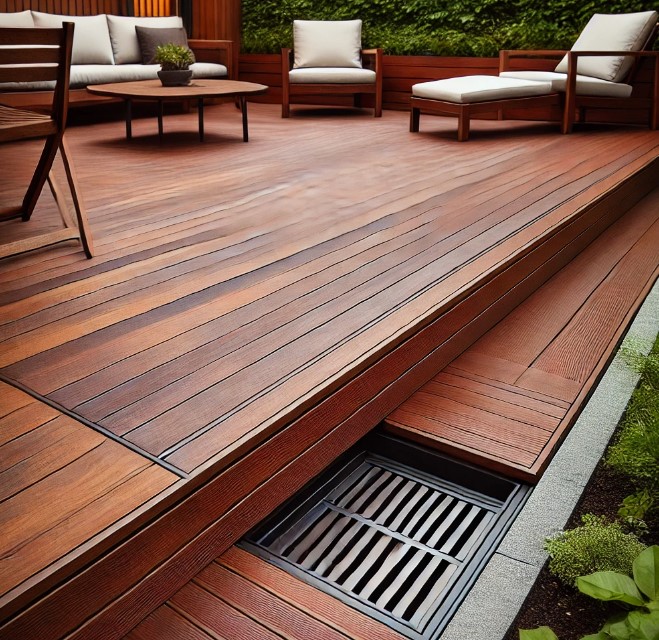
How It Works?
Install removable wooden panels or decking boards over the drain. Make sure they are designed to be easily lifted or unscrewed when needed.
Why It’s Effective?
Decking provides a polished and practical solution, particularly in outdoor living spaces. It not only hides the drain cover but also creates more usable space.
Tip: Use treated wood for long-lasting durability and ensure the area has proper ventilation for drainage.
7. Add Mosaic or Paint Designs
For a DIY approach, you can turn the drain cover into an art piece using mosaic tiles or decorative paint. This adds a personal, artistic touch to your garden.

How It Works?
Decorate the drain cover with colourful mosaic tiles or paint it with a design that blends into your garden’s theme. This is a great project for those who love adding custom details.
Why It’s Effective?
It allows for creativity while making the drain cover a feature rather than something to hide.
Tip: Use weatherproof materials to ensure the decorations last through different weather conditions.
8. Create a Rock Garden
If you’re a fan of natural elements, a rock garden is a wonderful way to disguise a drain cover. Using rocks, succulents, and small plants, you can create a visually appealing landscape that hides the drain cover.
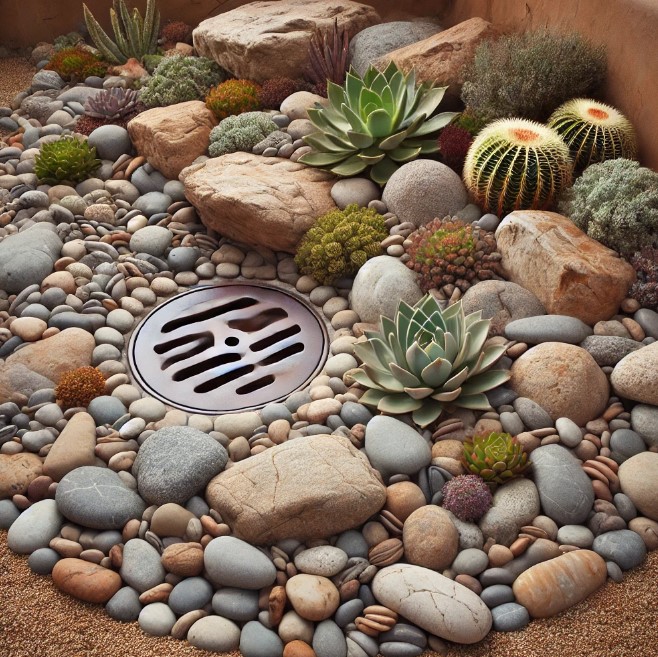
How It Works?
Arrange rocks and plants in a way that covers or surrounds the drain, making sure there’s easy access for maintenance.
Why It’s Effective?
A rock garden is low-maintenance and blends the drain cover into a natural, earthy landscape.
Tip: Choose drought-resistant plants that require little care, so the area stays low-maintenance.
Can You Landscape Around Drain Covers?
Yes, you can landscape around drain covers, but it’s important to ensure the cover remains accessible. When choosing plants or decorative elements, opt for non-invasive species and items that can be moved easily.
The key is to maintain proper drainage functionality while enhancing the garden’s visual appeal.
- Use Non-Invasive Plants: Plants with shallow root systems won’t interfere with the drainage below.
- Ensure Accessibility: Any method you use to disguise the drain cover should allow for quick access to the drainage system in case of maintenance.
How to Choose the Best Method for Your Garden?
When deciding how to disguise your drain cover, consider the following:
- Garden Style: Whether your garden is modern, rustic, or classic will influence the method you choose.
- Accessibility: How often do you need access to the drain? Some methods, like stepping stones or artificial turf, make access easier than others.
- Budget: Consider the cost of materials like plants, gravel, or decking. Some solutions are more budget-friendly than others.
Table: Comparison of Popular Drain Cover Disguise Methods
| Method |
Aesthetic Appeal |
Ease of Implementation |
Accessibility |
Cost |
| Potted Plants |
High |
Easy |
High |
Low |
| Stepping Stones |
High |
Moderate |
High |
Low to Medium |
| Decorative Grate |
Medium |
Moderate |
Easy |
Medium to High |
| Gravel/Pebbles |
High |
Easy |
High |
Low |
| Artificial Turf |
High |
Easy |
High |
Medium |
| Wooden Decking |
High |
Moderate |
Moderate |
Medium to High |
| Paint/Mosaic Designs |
Medium |
Easy |
High |
Low |
| Rock Garden |
High |
Moderate |
High |
Medium |
Conclusion
Disguising a drain cover in your garden doesn’t have to be difficult. Whether you choose to use plants, stepping stones, decking, or a rock garden, there’s a solution that can suit your style and budget.
The key is to ensure the cover remains accessible for maintenance while blending into the overall design of your garden.
By following these 8 creative ways to disguise drain covers, you’ll be able to maintain both the beauty and functionality of your outdoor space. So go ahead, get creative, and make that drain cover disappear into your garden’s landscape!
by Kanimozhi BV | Sep 18, 2024 | Ceiling, Interior
Need tips to spot early sign toxic black mold on ceiling? Toxic black mold is not just an eyesore—it can be a serious health hazard and cause significant damage to your home if left untreated.
While mold can appear anywhere in your home, ceilings are especially vulnerable due to moisture buildup from leaks, poor ventilation, or condensation from loft.
Spotting early signs of toxic black mold on ceiling can save you from costly repairs and potential health issues down the road.
In this guide, I’ll walk you through the early sign of toxic black mold on ceiling, how to detect it, and what to do if you find it on your ceiling. Taking action early is crucial to ensuring your home remains safe and healthy.
What Is Toxic Black Mold?
Toxic black mold, also known as Stachybotrys chartarum, is a type of mold that loves to grow in damp, humid places.
It’s usually black or dark green and can release harmful toxins into the air. When these mold spores become airborne, they can cause serious health issues, like breathing problems, allergic reactions, and even more severe symptoms if left unchecked.
One spot where mold often grows is the ceiling, especially in areas where moisture builds up, such as bathrooms, kitchens, or places with leaks.
Unfortunately, ceilings are easy to overlook, so mold can go unnoticed until it spreads or starts causing visible damage.
Keeping an eye out for early signs can help you catch it before it becomes a bigger problem.
Why Does Toxic Black Mold Appear on Ceilings?
There are several reasons why mold is particularly prone to developing on ceilings. Most of these are related to moisture and ventilation issues, which provide the perfect environment for mold to flourish.
- Dampness and Water Damage: Leaks from the roof, damaged pipes, or even excess condensation can introduce moisture into your ceiling. Over time, this moisture leads to mold growth, especially in areas that remain damp for extended periods.
- Poor Ventilation: Rooms like bathrooms and kitchens are common sites for black mold due to high humidity levels. If ventilation is poor and moisture isn’t able to escape, the ceiling becomes a prime spot for mold to grow.
- Condensation: In colder months, poorly insulated ceilings may suffer from condensation, especially in rooms with high humidity. This condensation seeps into the ceiling materials, creating an environment conducive to mold development.
What Are the Top 7 Early Sign of Toxic Black Mold on Ceiling?
Knowing how to spot the early signs of toxic black mold on your ceiling is key to preventing it from spreading. Look at a few warning signs:
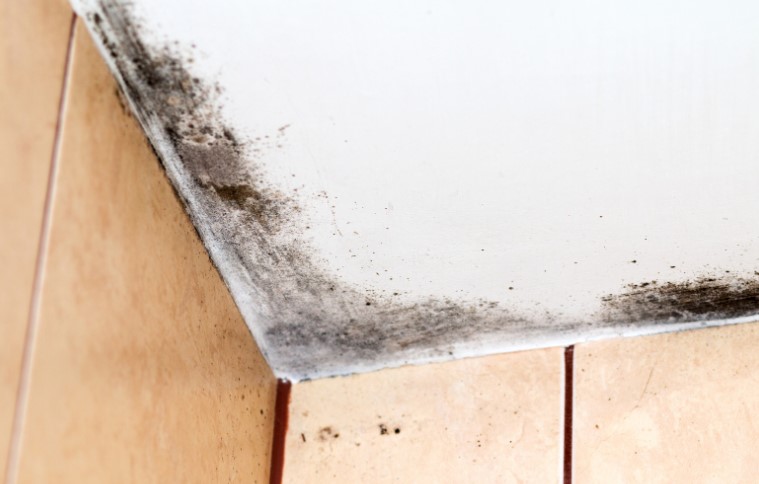
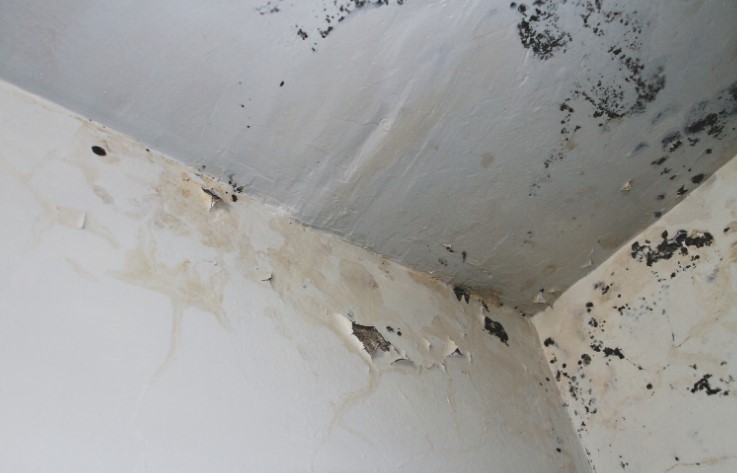
1. Discolouration
One of the first signs of black mold is discolouration on your ceiling. These spots may appear yellow, brown, green, or black. While the colour may vary depending on the type of mold, black spots.
Even if the spot isn’t black, discoloured patches can indicate moisture buildup, which may soon lead to mold growth.
- Tip: Look for uneven patches on the ceiling that don’t match the surrounding colour, especially after rain or in humid areas like bathrooms and kitchens.
2. Musty Odour
The next sign of mold is a strong, musty odour. Even if you can’t see the mold, the smell often gives it away. Black mold produces a pungent, earthy scent, especially in enclosed spaces.
If you notice a lingering smell, there’s a good chance mold is growing somewhere out of sight.
- Tip: Pay attention to musty smell in rooms or near ceiling corners with poor ventilation.
3. Peeling or Cracking Paint
When moisture accumulates behind your ceiling, it can cause the paint to peel, crack, or bubble. This is often a precursor to visible mold growth.
The moisture compromises the structural integrity of the ceiling materials, making it easier for mold to penetrate and thrive.
- Tip: If you notice peeling paint, it’s worth inspecting the area for further signs of water damage or mold.
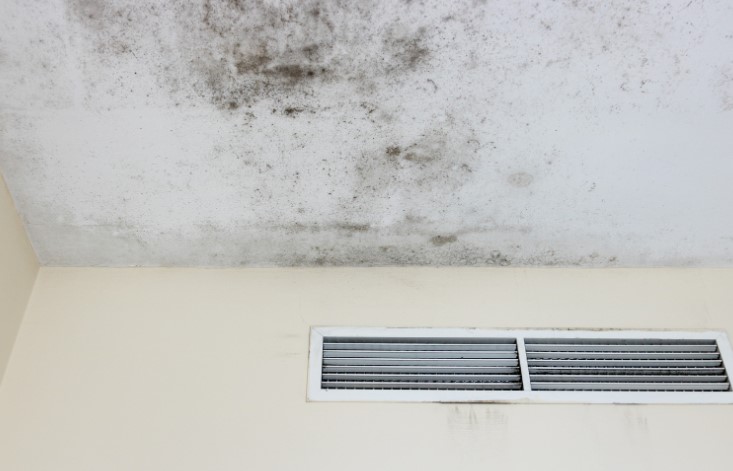
4. Visible Mold Growth
In some cases, black mold may already be visible on the ceiling. Mold appears as black or dark green patches, also they can be in irregular patterns.
These patches may start small but can quickly spread across a larger area if not addressed. Mold is often fuzzy or slimy in appearance and can spread rapidly in moist conditions.
- Tip: Even small spots of black mold should be taken seriously, as they can grow and lead to larger infestations.
5. Ceiling Sagging
If mold growth has been present for some time, you may notice that parts of your ceiling start to sag or bulge. This is a sign that moisture has weakened the ceiling materials, and mold is growing underneath.
Ceiling sagging is a more advanced sign and indicates that immediate action is required to prevent further damage or collapse.
- Tip: Don’t ignore sagging ceilings—address them immediately to avoid costly structural repairs.
6. Water Stains
Water stains, often resembling ring-like marks, can form on ceilings due to leaks or condensation buildup.
While not always a sign of mold, water stains indicate that moisture is present, which can typically lead to mold growth. If you see water stains, it’s a good idea to investigate further.
- Tip: Water stains are often precursors to mold, so keep an eye on these areas for future development.
7. Frequent Condensation
If you notice regular condensation on your ceiling or windows, this is a red flag. Condensation typically occurs in rooms where humidity levels are high, and poor insulation exacerbates the problem.
Over time, this moisture can lead to the growth of black mold on the ceiling.
- Tip: Address condensation early by improving insulation and ventilation in the room.
How Can You Detect Black Mold in Hidden Areas?
Sometimes, black mold may be growing in areas you can’t see, such as behind the ceiling or in the attic. Identifying mold in these concealed spots calls for a more hands-on approach:
- Moisture Meters: These devices can measure moisture levels in your ceiling. If there’s excess moisture, mold is likely to form.
- Infrared Cameras: These cameras can help detect temperature differences behind walls and ceilings, indicating moisture accumulation.
- Physical Inspection: Check for leaks, condensation, or damp spots near the ceiling edges, particularly in bathrooms, kitchens, or near windows.
By detecting moisture early, you can prevent mold from spreading to visible parts of the ceiling.
What Are the Health Effects of Black Mold?
Toxic black mold can cause a wide range of health issues, especially for individuals with pre-existing respiratory conditions or weakened immune systems.
Have a look on some of the most common symptoms:
- Respiratory Issues: Prolonged exposure to black mold spores can trigger asthma attacks, wheezing, coughing, and shortness of breath.
- Allergic Reactions: Mold exposure may cause sneezing, runny nose, skin rashes, and watery eyes.
- Headaches and Fatigue: Exposure to the mycotoxins produced by black mold can lead to headaches, fatigue, and difficulty concentrating.
If you suspect you have black mold in your home and experience any of these symptoms, it’s important to take immediate action and consult a healthcare professional.
How To Prevent Toxic Black Mold from Growing?
Preventing black mold requires addressing the root causes—moisture and poor ventilation. Here are some ways to stop mold from growing on your ceiling:
- Improve Ventilation: Install exhaust fans in bathrooms and kitchens to reduce moisture levels. Opening windows and using dehumidifiers also help maintain low humidity.
- Repair Leaks: Fix any roof, pipe, or window leaks as soon as they are detected. Leaks are the primary cause of mold in ceilings.
- Regular Maintenance: Periodically inspect your ceilings for early signs of mold, dampness, water damage or similar symptoms.
By staying proactive, you can significantly reduce the chances of mold forming in your home.
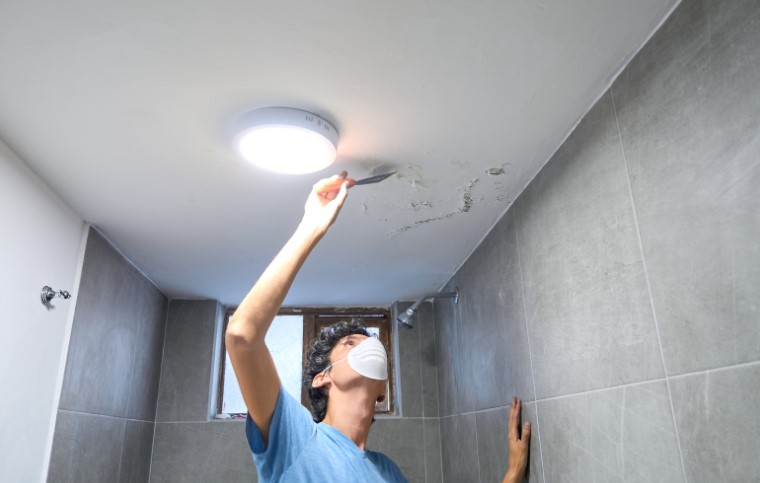
What Should You Do If You Find Toxic Black Mold?
If you discover black mold on your ceiling, it’s important to take the right steps to remove it safely:
- Wear Protective Gear: Wear gloves, a face mask, and protective clothing when handling mold.
- Ventilate the Area: Ensure the room is well-ventilated to avoid inhaling mold spores.
- Hire an Expert: If you’re dealing with a large or extensive mold problem, it’s wise to bring in a professional mold removal service. They have the skills and equipment to handle the job safely and ensure complete removal.
What Are the Common Early Sign of Toxic Black Mold on Ceiling?
| Sign |
Appearance |
Possible Causes |
| Discolouration |
Yellow, brown, or black spots |
Water damage, dampness |
| Musty Odour |
Unpleasant, musty smell |
Hidden mold growth |
| Peeling Paint |
Cracking or peeling sections |
Moisture buildup |
| Visible Mold Patches |
Black patches on ceiling |
Prolonged dampness, poor airflow |
| Water Stains |
Ring-like stains or marks |
Leaks or condensation buildup |
| Ceiling Sagging |
Slight bulging or sagging |
Moisture buildup under ceiling |
Conclusion
Spotting the early sign of toxic black mold on ceiling can save you from health problems and costly repairs.
By staying vigilant and addressing mold at its earliest stages, you can protect both your home and your family’s well-being.
Don’t wait for mold to spread—take action the moment you notice any signs, whether it’s discolouration, musty odours, or peeling paint.
Remember, prevention is always better than cure, so maintain good ventilation, repair leaks promptly, and regularly check for moisture buildup.
If the mold infestation worsens, it’s important to reach out to professionals to ensure safe and thorough removal.

by Kanimozhi BV | Sep 17, 2024 | Garden, Exterior
When is the legal time to mow lawn UK? You might have this question. Lawn maintenance is an essential part of homeownership in the UK, especially for those who take pride in keeping their garden neat and tidy.
However, many homeowners are unaware of the rules governing when you can legally mow your lawn.Mowing at the wrong time can lead to complaints from neighbours or even fines from your local council.
In this guide, I’ll cover everything you need to know about the legal time to mow your lawn in the UK, so you can avoid any legal trouble while keeping your garden looking its best.
What Are the Lawn Mowing Laws in the UK?
Lawn mowing in the UK is subject to several regulations, primarily centred around noise pollution.
Councils are responsible for maintaining peaceful neighbourhoods, and one of the ways they do this is by regulating the noise generated by activities such as lawn mowing.
The laws are not universal across the UK, but they generally follow the principle of restricting noise during certain hours of the day, particularly during early mornings and late evenings.
The UK lawn mowing laws are typically governed by local councils, with some councils enforcing stricter rules than others. It’s important to familiarize yourself with your specific region’s guidelines to ensure you’re complying with the law.

What Time Can I Mow My Lawn Legally in the UK?
In most parts of the UK, you can mow your lawn during the daytime, typically between 7 AM and 11 PM on weekdays.
These times are based on general noise control laws designed to minimize disturbances in residential areas.
- Weekdays: Commonly, lawn mowing is allowed from 7:00 AM to 9:00 PM.
- Weekends: The start time is often pushed back to 8:00 AM or 9:00 AM to respect neighbours who may want to sleep in.
It’s advisable to check with your local council to confirm these times, as they may vary by region or even between different types of residential areas (e.g., rural vs. urban).
When Is It Too Early for Lawn Mowing?
One of the common complaints councils receive is about early morning lawn mowing.
Mowing with lawn mower too early can disrupt the peace and quiet that most people expect in the morning hours, especially on weekends.
In general, mowing before 7:00 AM on weekdays or before 8:00-9:00 AM on weekends is considered too early and could lead to complaints.
Early morning mowing is seen as a violation of noise pollution laws, as people are more likely to be at home and seeking peace during these times.
When Is It Too Late to Mow the Lawn?
Just as mowing too early can cause problems, mowing too late in the evening can disturb neighbours, especially in more densely populated areas.
Late-night mowing is generally prohibited after 9:00 PM in most parts of the UK. Some areas may have stricter regulations, particularly in residential neighbourhoods, where noise restrictions can kick in as early as 8:00 PM.
If you often find yourself pressed for time in the evenings, it’s best to schedule your mowing during the day or earlier in the evening to avoid complaints from neighbours or fines from your local council.
Can I Mow My Lawn on a Sunday or Bank Holiday?
Lawn mowing on Sundays and Bank Holidays is a grey area. Many councils have specific rules that restrict noisy activities on these days, especially during early morning or late evening hours.
For example, some councils recommend that residents avoid noisy garden work before 10:00 AM on Sundays.
Bank Holidays, which are typically days of rest, also carry similar restrictions. It’s always a good idea to check with your local council to see if there are specific Sunday and holiday guidelines in your area.

How Do Noise Pollution Laws Impact Lawn Mowing?
The UK has strict noise pollution regulations, which are designed to prevent excessive noise in residential areas.
Under these regulations, local councils have the authority to investigate and act on noise complaints, including those related to lawn mowing.
If you consistently mow your lawn during restricted hours or create excessive noise, neighbours may file a formal complaint, leading to an investigation by the local council.
If found in violation of noise laws, you may face penalties such as fines or formal warnings. It’s crucial to be aware of and comply with these laws to maintain harmony in your community.
What Are the Penalties for Mowing Your Lawn at the Wrong Time?
If you mow your lawn outside of the allowed hours or ignore warnings from your local council, you may be subject to penalties. While the specific penalties vary by region, they often include:
- Fines: Councils may issue fines if you repeatedly break noise regulations.
- Warnings: In some cases, you may receive a written warning before any fines are issued.
- Legal Action: In extreme cases where noise disturbances persist, councils may take legal action.
Staying informed about the grass cutting regulations UK and your local council’s rules can help you avoid these penalties.
If you’re unsure about the lawn mowing regulations in your area, or if you’ve received complaints from your neighbours, it’s a good idea to contact your local council.
Councils typically have guidelines available on their websites, or you can reach out to them directly for clarification.
Here are a few councils that provide detailed guidelines on lawn mowing time restrictions:
- London Borough of Camden
- Manchester City Council
- Birmingham City Council

Lawn Mowing Time Guidelines by Region
| Region |
Earliest Time |
Latest Time |
Special Rules |
| London |
8:00 AM |
9:00 PM |
No noise on Sundays |
| Manchester |
7:30 AM |
10:00 PM |
Holidays restrictions |
| Birmingham |
7:00 AM |
9:30 PM |
No mowing after 8 PM Sat |
This table highlights the typical lawn mowing guidelines in major UK cities. Be sure to check your local council’s website for the most up-to-date information specific to your area.
Tips for Avoiding Complaints When Mowing Your Lawn
To avoid complaints, here are a few tips that can help:
- Mow during appropriate hours: Stick to the recommended times to avoid noise complaints.
- Use quieter equipment: Electric or battery-powered lawnmowers are quieter than petrol mowers.
- Talk to your neighbours: If you’re planning to mow outside of normal hours, consider discussing it with your neighbours in advance.
These simple practices can help you maintain peace in your community while keeping your lawn in great shape.
When Should I Use Alternatives to Mowing?
If you’re restricted by time or the noise levels of your mower, consider using alternative grass maintenance methods. For example:
- Mulching: This can be done during non-peak hours and is quieter.
- Quiet electric mowers: These are a great alternative if you need to mow during early mornings or late evenings.
These alternatives to mowing allow you to maintain your garden without disrupting your neighbours or breaking noise laws.
Conclusion
In conclusion, understanding the legal time to mow your lawn in the UK is crucial for maintaining good relations with your neighbours and avoiding fines from your local council.
By following the rules set by your local council, being mindful of noise pollution, and taking steps to be a considerate neighbour, you can keep your lawn looking its best without causing unnecessary disturbances.
Be sure to always check your local council’s specific guidelines and opt for quieter or alternative grass-cutting methods when possible.

by Kanimozhi BV | Sep 17, 2024 | Garden, DIY Ideas, Exterior
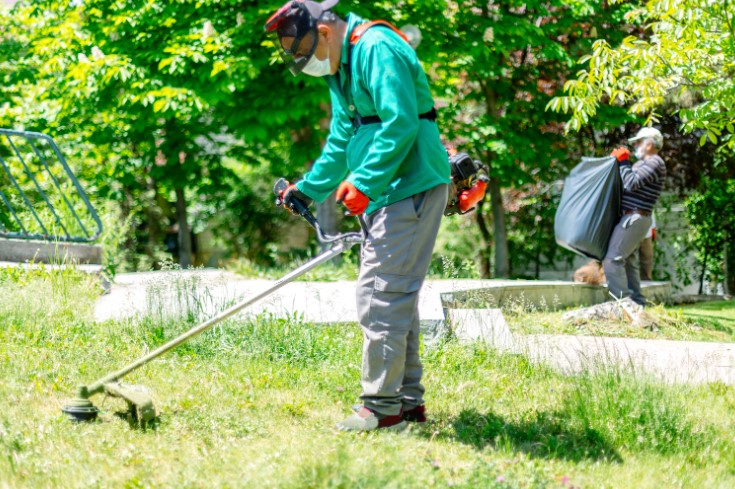
Killing grass permanently may seem like a challenging task, but whether you’re tired of constantly mowing your lawn with lawn mower, dealing with invasive weeds, or preparing an area for landscaping, this step-by-step guide will help you find the best method.
I’ll walk you through both natural and chemical options to kill grass permanently, ensuring no regrowth. We’ll cover all the essential steps to get the job done effectively and efficiently with this guide on how to kill grass permanently.
Why Would You Want to Kill Grass Permanently?
Many homeowners and gardeners seek to remove grass permanently for a variety of reasons:
- Transforming Lawns into Gardens: Some people want to replace their grassy lawns with flower beds or vegetable gardens.
- Invasive Weed Control: Weeds and unwanted grass species can overrun a lawn or garden, requiring permanent removal to restore balance.
- Reduce Maintenance: Grass requires ongoing maintenance, including mowing, watering, and fertilizing, which can be time-consuming.
- Aesthetic Preferences: Some homeowners prefer hardscaping or want to install a patio or deck where grass is no longer needed.
By killing the grass permanently, you can create a new landscape that fits your goals and reduces long-term maintenance.
What Are the Best Methods to Kill Grass Permanently?
There are several methods to achieve permanent grass removal, and your choice will depend on factors like:
- Effectiveness: How fast and permanent the result is.
- Environmental impact: Whether you prefer chemical-free or organic solutions.
- Time and Effort: Some methods are quicker but require more labor or chemical intervention.
Let’s break down the most effective methods:
- Chemical herbicides (e.g., glyphosate)
- Natural methods like vinegar or solarization
- Boiling water and salt
- Smothering techniques (mulch, plastic, cardboard)
What are the Step-By-Step Methods To Kill Grass Permanently?
Step 1 – Assess Your Area and Choose a Method
Before jumping into the removal process, it’s important to evaluate the area and decide on the most suitable method based on:
- Size of the area: Larger lawns may benefit more from chemical herbicides, while smaller patches can be treated using natural methods.
- Soil and terrain conditions: Rocky or uneven terrain might require more preparation before applying any removal techniques.
- Surrounding plants: Consider how your method will affect other plants. For example, herbicides could kill nearby plants if not applied carefully.
At this stage, you should decide between chemical or natural solutions.
Step 2 – Preparing the Ground Before Grass Removal
Proper preparation ensures that your efforts result in long-term grass removal. Here’s what you need to do before applying any method:
- Clear debris: Remove any rocks, sticks, or large debris that could obstruct the grass removal process.
- Mow the grass: Mow the grass as short as possible to make it easier for the solution to penetrate. There are several DIY methods to mow the grass without lawn mower.
- Water the area: Lightly water the area to soften the soil, which helps with penetration if you’re applying chemicals or using manual methods like digging.
- Aerate or loosen the soil: This allows solutions like vinegar or herbicides to reach the grass roots more effectively.
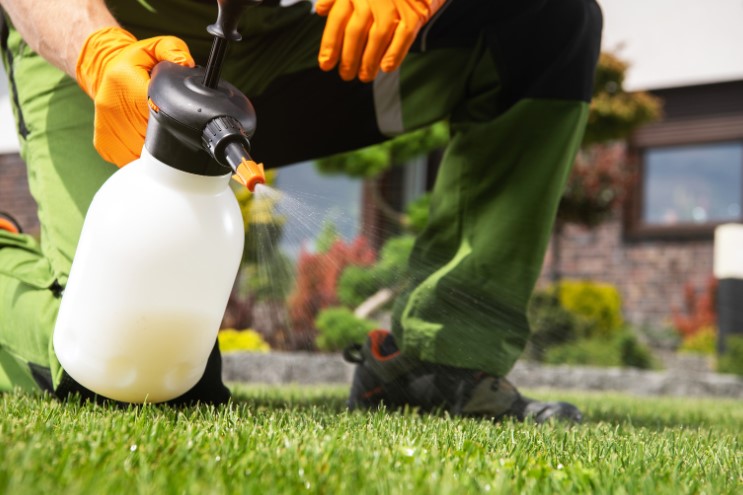
Step 3 – Using Herbicides: Pros and Cons
If you’re considering using chemical herbicides, here’s how you can proceed:
- Non-selective herbicides, like glyphosate, are the most effective for killing grass permanently. These herbicides kill everything they touch, so be cautious around other plants.
How To Apply?
- Wear protective clothing: Always protect your skin, eyes, and lungs.
- Apply on a dry day: Ensure there’s no rain for 24-48 hours to prevent the herbicide from washing away.
- Direct application: Spray the herbicide directly onto the grass, ensuring full coverage.
What are the Pros Of Herbicides?
- Fast and effective.
- Works for large areas.
What are the Cons Of Herbicides?
- Can harm surrounding plants.
- Potential negative impact on the environment.
Step 4 – Using Natural Methods to Kill Grass Permanently
For those who prefer a more eco-friendly approach, here are a few natural methods:
How To Use Vinegar To Kill Grass Permanently?
- A mix of white vinegar and water can be sprayed directly onto grass. The acetic acid usually dehydrates and kills the grass.
- Use a spray bottle and apply directly to the grass, repeating every few days for the best results.
How To Use Boiling Water and Salt To Kill Grass Permanently?
- This method is ideal for small patches of grass. Spray boiling water mixed with table salt over the grass. It completely destroys the roots and prevents regrowth.
How To Use Solarization To Kill Grass Permanently?
- Cover the grass with clear plastic to trap heat and sunlight, effectively “cooking” the grass.
- This method takes a few weeks but is highly effective and completely natural.
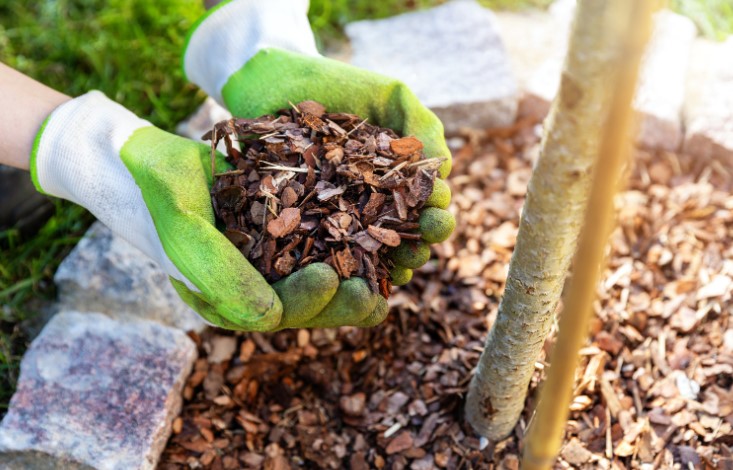
Step 5 – Smothering Grass with Mulch or Cardboard
Smothering the grass with cardboard or mulch prevents it from receiving sunlight and water, killing it over time.
What are the Steps to follow?
- Lay down cardboard: Cover the area with large sheets of cardboard.
- Add mulch on top: Add 2-3 inches of mulch to keep the cardboard in place.
- Leave for 2-3 months: Over time, the grass will die from lack of sunlight.
This method is perfect for those converting grassy areas into flower beds or vegetable gardens.
Step 6 – Preventing Grass Regrowth
After successfully killing the grass, preventing regrowth is essential to keeping your yard or garden in perfect shape.
Here are some tips:
- Install weed barriers (fabric or plastic sheeting) under any new plants or soil to block sunlight.
- Apply a thick layer of mulch for the safety of any grass seeds from sprouting.
- Regularly inspect the area for any signs of grass and treat small patches immediately before they spread.
Table: Comparison of Grass Killing Methods
| Method |
Effectiveness |
Environmental Impact |
Time to See Results |
Cost |
| Chemical Herbicides |
Very High |
High (may harm soil) |
1-2 weeks |
Moderate |
| Vinegar |
Moderate |
Low (natural) |
1-3 weeks |
Low |
| Solarization |
High |
Low (eco-friendly) |
4-6 weeks |
Low |
| Salt & Boiling Water |
Moderate |
Low (but may harm soil) |
1-2 weeks |
Low |
| Smothering (Mulch) |
High |
Low (eco-friendly) |
2-3 months |
Moderate |
Conclusion
Killing grass permanently can be achieved through a variety of methods, whether you prefer chemical herbicides or natural solutions like vinegar and solarization. Each method comes with its own pros and cons, but by carefully following the steps outlined above, you can ensure that the grass won’t regrow.
Remember, preventing regrowth by using weed barriers and maintaining the soil is just as important as the initial removal process. With a bit of effort and the right approach, you’ll be able to keep your garden or yard grass-free for good.
Common Questions About Permanent Grass Removal
1. Will herbicides damage my garden plants?
- Yes, if they are non-selective like glyphosate, they can kill surrounding plants. It’s best to use them on wind-free days and cover nearby plants.
2. Can I kill grass without harming the environment?
- Absolutely. Methods like vinegar, solarization, and smothering are all eco-friendly options.
3. How long does it take for grass to die permanently?
- Chemical methods take 1-2 weeks, while natural methods like solarization may take up to 6 weeks depending on the method.
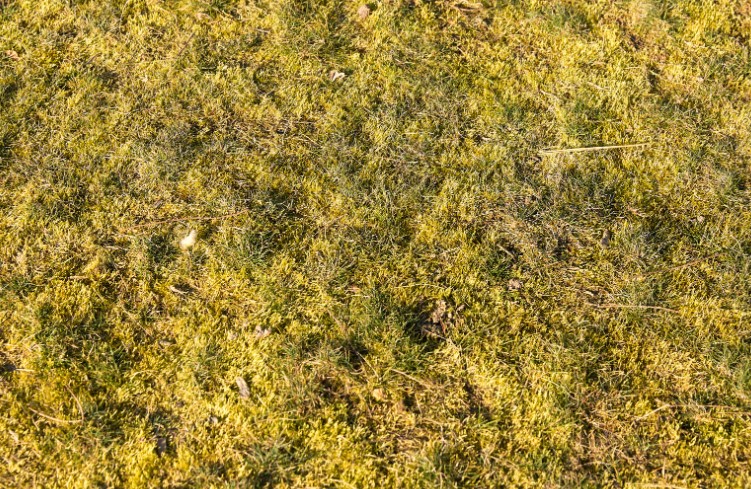
by Kanimozhi BV | Sep 16, 2024 | Garden, Exterior
Moss growing in your lawn can be a persistent problem, taking over areas where grass struggles. While it’s soft and green, moss competes with grass for space and nutrients, often leaving lawns weak and patchy.
In this guide on how to get rid of moss in lawn, I’ll walk you through effective ways to get rid of moss permanently while ensuring your lawn remains healthy and vibrant.
Why Does Moss Grow in Your Lawn?
Moss thrives in lawns for a variety of reasons, typically where grass is weak and the environment is conducive to its growth. Here are the most common causes:
- Poor Drainage and Excessive Moisture: Moss loves damp conditions. If your lawn is waterlogged or doesn’t drain well, it creates a perfect environment for moss to spread.
- Compacted Soil Limiting Airflow: When soil is compacted, it restricts airflow, water, and nutrients from reaching the grass roots, allowing moss to take over the weakened areas.
- Shady Conditions Affecting Grass Growth: Moss thrives in areas with low light. If your lawn is in the shade of trees, buildings, or fences, grass will struggle to grow, giving moss an advantage.
- Acidic Soil: Moss mainly aims for acidic soil with a low pH. If your lawn has a higher acidity level, grass will struggle while moss will flourish.
Understanding these root causes will help guide your moss removal strategy, ensuring long-term success.
How To Get Rid Of Heavy Moss In Lawn?
Step 1: Use a Moss Killer
To effectively kill moss, a moss killer is often the first line of attack. There are several options:
Chemical Moss Killers:
- The most common moss killers contain ferrous sulfate (iron sulfate). These are highly effective, turning moss black in 2-3 weeks.
- The iron content dries out the moss, killing it while strengthening the grass. However, care must be taken to follow the instructions, as over-application can scorch grass.
Natural Remedies:
- If you prefer a chemical-free approach, natural methods like baking soda or dish soap solutions can be effective.
- To use:
- Mix 3 tablespoons of baking soda or 25 mL of dish soap with 1 litre of water.
- Spray the solution liberally over the moss.
- Wait 2-3 weeks for the moss to die, then rake it out.
Regardless of the method, once the moss dies, you’ll need to remove it to prevent it from returning.
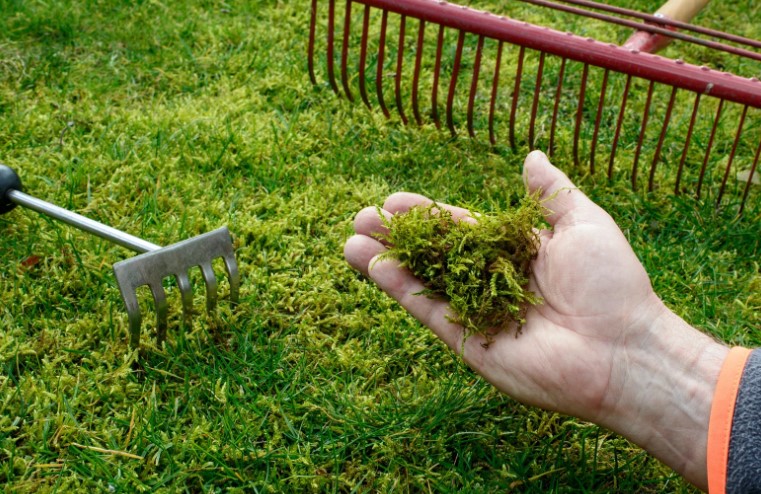
Step 2: Scarification and Raking
Scarifying (or dethatching) your lawn is the process of removing thatch—dead moss, grass, and other debris that sits on the soil surface and prevents healthy grass growth.
Manual Scarification:
- For smaller lawns, a spring tine rake can be used to manually remove the dead moss. This is labor-intensive but effective.
Mechanical Scarification:
- For larger areas or dense moss coverage, a mechanical scarifier is a better option. These machines quickly and efficiently pull up dead moss and other debris, allowing better airflow and nutrient absorption into the soil.
Removing the dead moss through scarification is critical for improving the health of the lawn and preventing future moss growth.
Step 3: Improve Lawn Drainage and Aeration
Moss thrives in poorly drained, compacted soils, so addressing these issues is crucial. Here’s how:
- Aerating Your Lawn: This involves creating small holes in the soil to allow air, water, and nutrients to penetrate the grass roots. You can use a garden fork for small areas, or for larger lawns, consider renting a mechanical aerator.
- Top-Dressing the Lawn: After aeration, top-dressing with a mix of loam, sharp sand, and compost will help improve the soil’s structure and drainage. This mixture allows water to move freely through the soil, reducing the likelihood of waterlogging and moss growth.
Regular aeration and proper drainage are essential for maintaining a moss-free lawn and encouraging healthy grass growth.
Step 4: Adjust Soil pH and Fertilize
Moss thrives in acidic soil, so adjusting your lawn’s pH to a more neutral level can help deter its growth.
- Using Lime to Reduce Acidity: Applying lime will raise the soil’s pH, making it less acidic. A soil test can determine your lawn’s pH level, and based on the results, you can apply the appropriate amount of lime.
- Fertilizing the Lawn: Strengthening your grass with a balanced fertilizer will help it outcompete moss. Fertilizers rich in nitrogen encourage lush, dense grass growth, which naturally prevents moss from taking over.
A well-fed lawn is the best defense against moss, as strong grass leaves little room for unwanted growth.
Step 5: Prevent Future Moss Growth
Once you’ve removed the moss, the key is preventing its return. Here’s how:
- Mow Your Lawn Correctly: Mowing too short makes stress in grass and leaves it vulnerable to moss. Keep your grass height at 2.5-4 cm to encourage stronger growth.
- Trim Trees and Shrubs: Reducing shade will help grass grow more vigorously, as moss prefers shady conditions. Prune overhanging branches or shrubs to allow more sunlight to reach your lawn.
- Reseed Bare Patches: After removing moss, reseed any bare spots with grass seed, particularly in areas prone to moss. Thicker grass growth helps prevent moss from establishing again.
Can I Leave Moss in My Lawn?
Moss isn’t always a problem. In certain situations, it can be an acceptable ground cover, especially in shaded, low-traffic areas where grass struggles. Moss requires little maintenance, can tolerate compact soil, and stays green all year round.
However, if you prefer a traditional grass lawn, moss is generally seen as undesirable since it competes with grass and makes the surface uneven.
What are the Common Mistakes When Trying to Remove Moss?
While removing moss from your lawn, it’s easy to make a few common mistakes:
- Overusing Chemical Treatments: Applying too much moss killer can damage the grass and create patchy areas.
- Raking Moss Without Killing It First: This can spread moss spores across the lawn, causing it to re-establish quickly. Always treat moss before raking it out.
- Ignoring the Underlying Causes: Simply removing moss without addressing the causes—such as poor drainage, compact soil, or shade—will only lead to its return.
By following these steps, you can effectively get rid of moss in your lawn and prevent it from coming back. A healthy lawn is your best defense against moss, so focus on proper lawn care practices to keep it strong and vibrant.
FAQs About Removing Moss From Lawn
1. Can I remove moss without using chemicals?
Yes, you can remove moss using natural solutions like baking soda or dish soap. Improving the lawn’s health through aeration, proper mowing, and addressing drainage issues is also essential for long-term prevention.
2. How often should I scarify my lawn?
It’s recommended to scarify once or twice a year, typically in the spring and autumn, when moss growth is at its peak. Regular scarification helps maintain lawn health and prevents moss buildup.
3. Does moss indicate poor lawn health?
Yes, moss is often a sign of underlying lawn problems such as poor drainage, compacted soil, or insufficient sunlight. Addressing these issues will help improve overall lawn health and prevent moss from returning.
4. Is it safe to compost the dead moss?
If you used natural methods to kill the moss, it’s safe to compost. However, if you used chemical treatments, wait at least six weeks before composting, and ensure it’s mixed well with other organic material.
